The goal of this page is to teach you how Unreal Engine, Blueprints and visual scripting works. Everything here should be understandable by someone who has never programmed or used Unreal Engine.
This page has a lot of content, you can easily navigate between categories using the Table of Contents on the right. If something is overwhelming you, you can skip it and come back later.
A lot of stuff such as tips are collapsed, I’ve done this to make the page more readable and easy to navigate, it doesn’t mean that it’s not important !
For C++ users
If you want to learn more about how to work with C++ in UE, I would recommend checking Laura’s C++ speedrun blog post.
For Unity users
You might want to check out this official documentation about “UE to Unity”
Access & getting started
Download Unreal Engine from the Epic Games launcher:
- Click on “Unreal Engine” on the left side bar
- On the top bar click on “Library”
- Add the UE version you want
- If needed, download extra content for your UE version by clicking on “Options” (after clicking on the small down arrow next to “Launch/Update/Install/Resume”)
Once you launched a engine version you will be able to load a existing project or create a new one using a template.
Tip
You can directly open a existing UE project with the correct engine version from the “My Projects” area
Other UE stuff such as your assets from your Fab library are accessible below the engine version, if some are missing try to refresh using the refresh button.
Templates
UE offers various templates to start your project.
Interface anatomy
Here are the main components of the UE interface:
Global
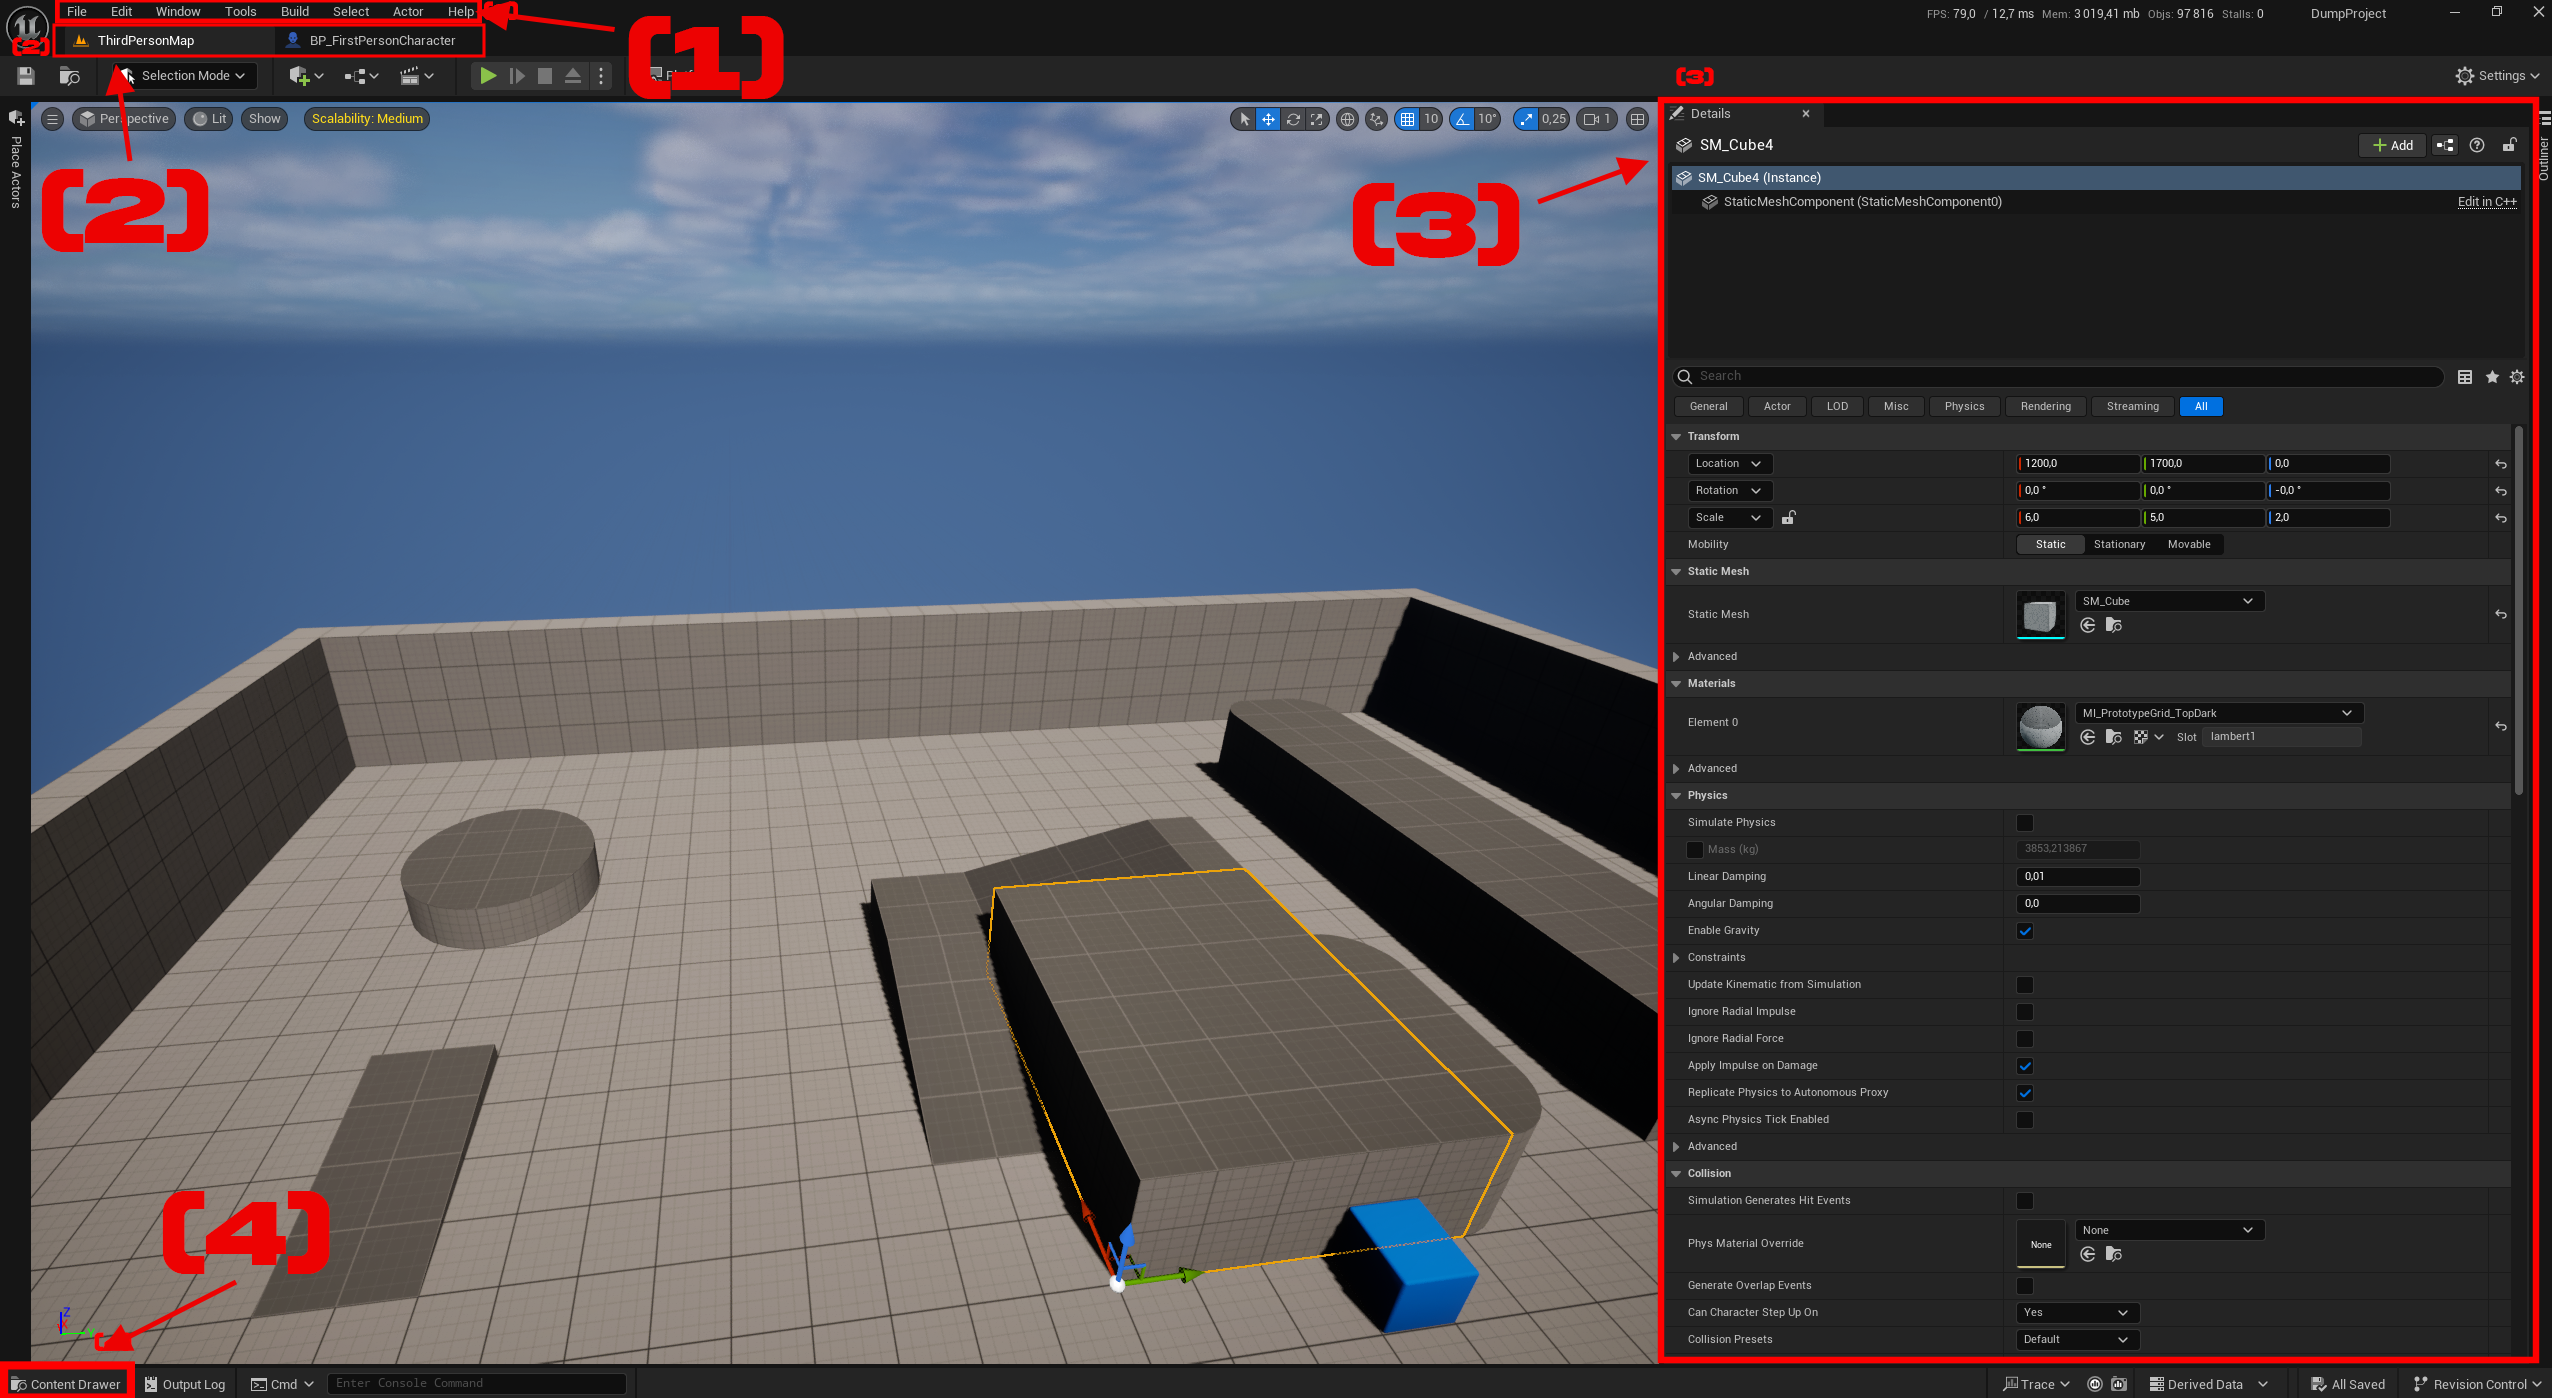
Top bar (1)
Here you have access to more tools, as well as various settings for your window and project.
Tabs (2)
Where all opened tabs are shown
Details panel (3)
When you select an actor or asset, its properties and settings appear here, allowing you to tweak and configure various parameters.
Content browser (4)
It serves as your primary tool for managing assets, such as meshes, textures, materials, and blueprints
Viewport & Level

Viewport (1)
A view of the level
Outliner (2)
Displays a hierarchical list of all the actors in your current level, making it easy to select and organize them.
Tip
You can make folders to better organize your actors
External Top bar (3)
- (3A) Mode: This panel contains various tools for editing your level, including landscape, foliage, and geometry tools.
- (3B) Add actors.
- (3C) Blueprint quick access.
- (3D) Level Sequence.
- (3E) Play control & settings.
- (3F) Packaging options.
- (3G) More settings.
Scalability settings
You can change the viewport scalability settings (also known as quality settings)
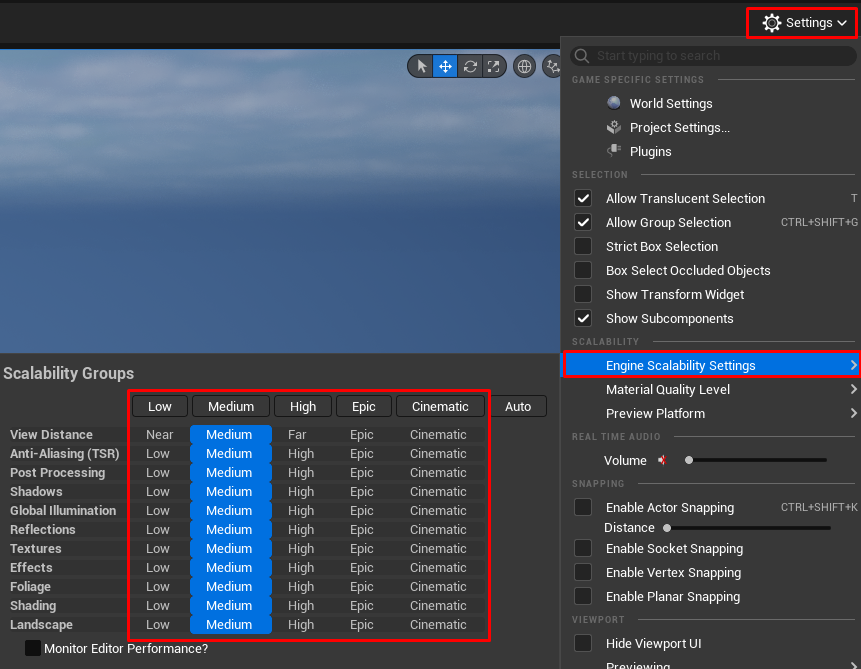
If the settings are different from High, you can change them from the top left of the viewport.
Inner top bar left (4)
- Viewport settings
- Viewport perspective
- Viewport rendering method
- Viewport displayed info
Inner top bar right (5)

Left to right:
- Edit mode (Select, Move, Rotate, Scale)
- Pivot mode (Global/Local)
- Surface snapping
- Move snapping
- Rotate snapping
- Scale scapping
- Camera Speed
- Show more viewports
World Settings (6)
A lot of settings on the current world (~= Level)
Blueprint

Graph view (1)
Here you can see and edit your blueprint code
Viewport (2)
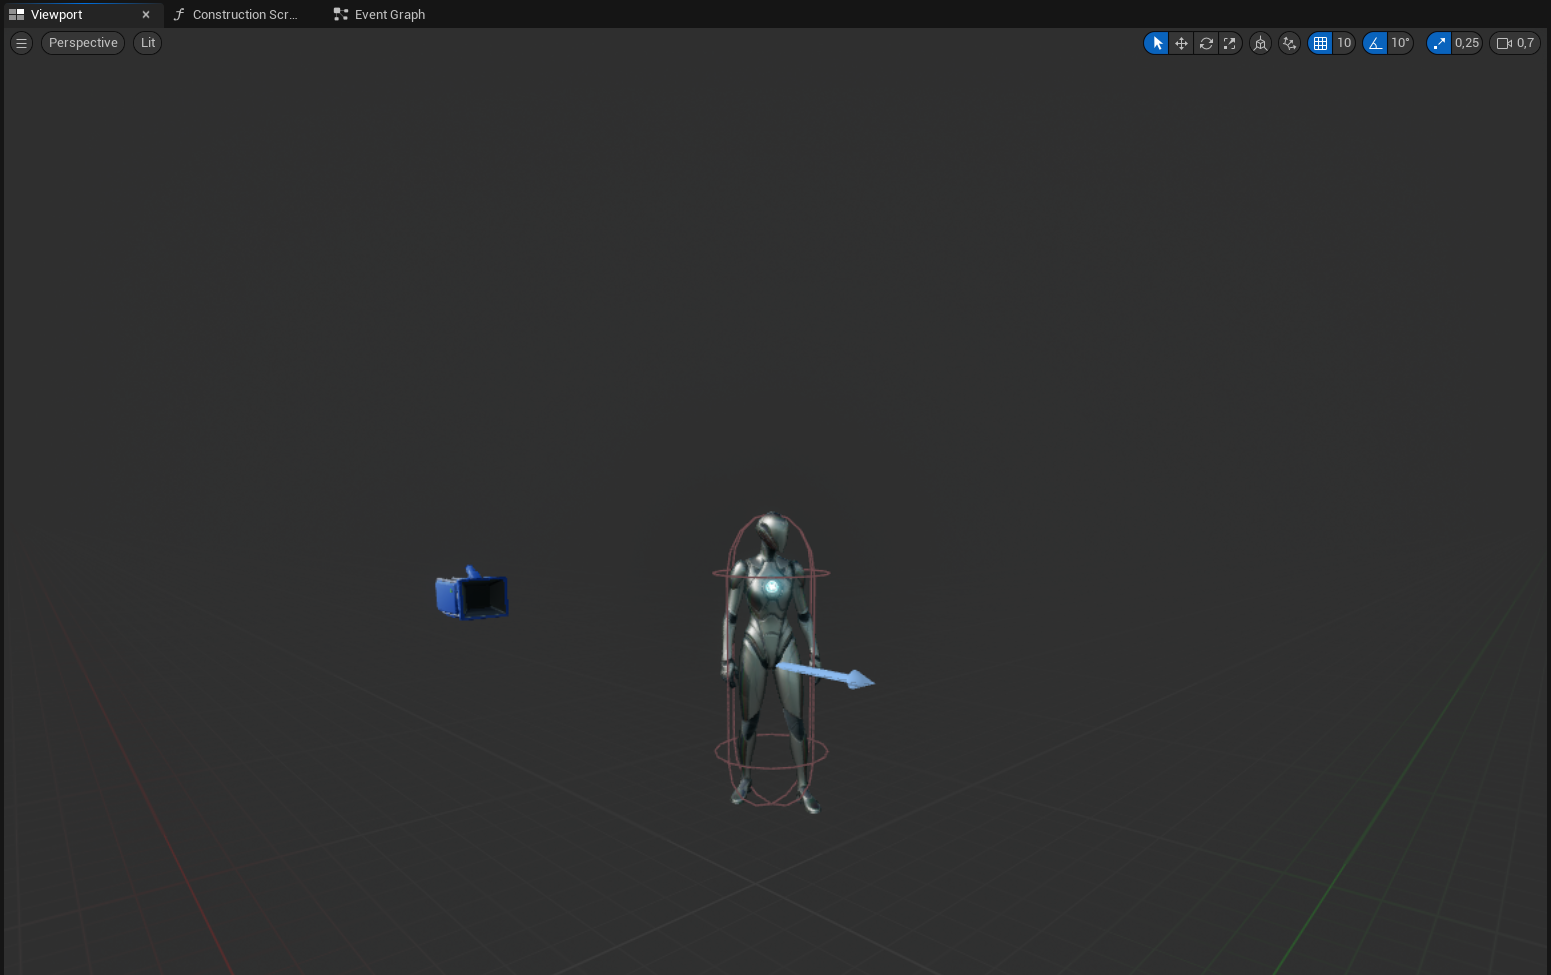
Here you can see and move scene components inside the actor
Components (3)
Displays all components, you can edit or remove them or add some new ones.
Functions & Macros (4)
A list of the functions and macros your blueprint class have
Variables (5)
A list of the variables your blueprint class have
Engine anatomy & basics
Introduction
Conventions
Unreal Engine location, rotation and scale units are in centimeters.
In UE, the forward axis is X and the up axis is Z.
Coding
When you code in UE, you have two layers: the C++ layer and the Blueprint layer.
C++ can be mandatory to use special features or tools. C++ is also a lot faster than Blueprint code, which can make it a very important choice depending on what logic you want to execute in your game.
The Blueprint layer is built on top of the C++ layer, either on already existing engine classes or on yours that you made in C++, which means you don’t need to do anything in C++ and can work on your game with only the Blueprint layer (not recommended for big or multiplayer projects).
A Blueprint is an asset that inherits from a class, for example Actor (AActor being the real C++ name). In a blueprint you can already see/edit what is exposed from C++ (for example variables or components).
Actor blueprint hierarchy
Unlike other engines like Unity, you don’t create a empty “Game Object” then add components.
In UE you create a new blueprint asset, and this blueprint can already hold logic.
Warning
You can only create new blueprints from the content browser or using the Quick Add tool. This means that you can’t make a new and unique blueprint classes/instances directly in a level, it must exist in the Content Browser.
You can extend any Actor class with Actor Components, Scene Components or Interfaces.
- A
Actor Componentdon’t have any transform, it’s just a block of whatever logic attached to your actor. - A
Scene Componentis the same as anActor Componentbut it has a transform and must be attached somewhere on your Actor (at the root of the actor or on any otherScene Component), it also support sockets. - For
Interfacesee Interfaces
Info
More about Actors in Main classes
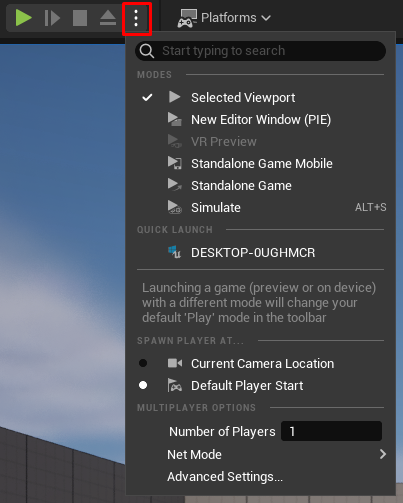
Playing in editor
When you test your game in the editor (!= packaged build), you are by default in PIE (Play In Editor).
You can find PIE settings here:
Structure
TODO
Check the graph or watch the video about the basics of engine structure here
Main classes
For new programmers
If you are new to programming or if you don’t know what a
class,childorparentis please read Classes and inheritance before going any further !
Actor
“Actor is the base class for an Object that can be placed or spawned in a level. Actors may contain a collection of Actor Components, which can be used to control how actors move, how they are rendered, etc.” - UE Docs
About persistence
Some actor classes doesn’t persist but are somehow copied over the new level.
Pawn
“Pawn is the base class of all actors that can be possessed by players or AI. They are the physical representations of players and creatures in a level.” - UE Docs
Character
“Characters are Pawns that have a mesh, collision, and built-in movement logic. They are responsible for all physical interaction between the player or AI and the world, and also implement basic networking and input models.” - UE Docs
Player Controller
“Player Controllers are used by human players to control Pawns.” - UE Docs
Player State
“A Player State is created for every player. Player States should contain game relevant information about the player, such as score, etc.” - UE Docs
Game Mode
“Defines the game being played. It governs the game rules, scoring, what actors are allowed to exist in this game type, and who may enter the game.” - UE Docs
Game State
“Is a class that manages the game’s global state, and is spawned by the Game Mode.” - UE Docs
Game Instance
“A high-level manager object for an instance of the running game. Spawned at game creation and not destroyed until game instance is shut down.” - UE Docs
Persists between levels
HUD
“Base class of the heads-up display. This has a canvas and a debug canvas on which primitives can be drawn.” - UE Docs
The HUD class can be used as a isolated area to manage to create, show, hide and destroy UserWidgets.
User Widget
“UserWidgets are used in Epic Games’ UI System, called Unreal Motion Graphics (UMG).” - Cedric
This is the class you will use to display text, menus, inputs and more.
To go further ...
More info can be found on Cedric’s Multiplayer Compendium and the Official UE C++ API Reference
Blueprints
A mix of my naming convention and what most people do: For Designers
Variables
Here is a list of the most used variables types.
Name & color | Description | Example of values |
|---|---|---|
 | A boolean | True or False |
 | A integer number (equivalent to int32) | -1, 5, 9521 |
 | A floating-point number | 0, 3,45, -0.1 |
 | A character container, useful to mute (edit) at runtime. | "", "Hello","Hello World!" |
 | Same as a String, but not meant to be mutable. Mostly used for the localization system. | English: Hello, French: "Bonjour" |
 | A engine struct (x,y,z), mostly used for locations or directions. | (0,0,0), (3,-5,1) |
 | A engine struct (x,y,z), used for rotations. | (0,0,0), (3,-5,1) |
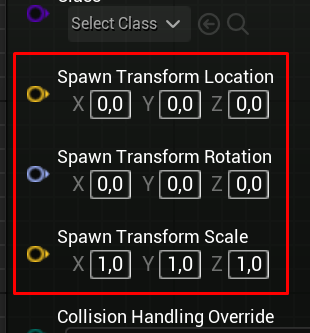
 | A engine struct, contains a Vector (for location), Rotator (for rotation) and a Vector (for scale). | ((100,50,0),(0,-90,0),(1,1,1)) |
 | A reference to an instance of a object. | Null, Light, Actor, Camera |
Reading and writing (
Get/Set)When you use a variable, you either read its value (
Get), or you write a new value (Set).
You canGetorSeta variable by typingGet My Variable NameorSet My Variable Name(You need to have the correct context to make it appear).To place a
Getnode of your variable from theMy Blueprinttab, holdCtrlwhile dragging then release. To place aSetnode holdAltwhile dragging then release.
Variable color
Depending on the variable type, the pin and line color will be different.
More on the
ObjecttypeThe
Objectvariable type has 4 “sub types”.
Object Reference: A reference to an instance of a object.Class Reference: A reference to a class of a object.The
softversion is special, a soft reference (or pointer) is a type that contains a path to an asset (which can be none), and it contains a pointer to an instance of that asset (which can be null).
It is very important and common to use soft object/class references to load asynchronously assets (for example some sounds that doesn’t need to be loaded at the beginning of the game).
It’s also very useful if you want to get a reference to an actor placed in a level (this would use the actor absolute path in the level).
Soft Object Reference: A soft reference to an instance of a object.Soft Class Reference: A soft reference to a class of a object.
Formatting
TextWhen using a text variable, you can easily format it. For example, lets say we have an item struct, it holds the item name and price. We want to display in a shop dialogue text “
<Item name>costs<item price>”.This is easily done using the
Formatnode:

Here theresultwill beApple costs 3.
For each{...}in theFormatinput a new input pin will appear
EnumtypeEnums are used to give names to constants, which makes the code easier to read and maintain. Use enums when you have values that you know aren’t going to change, like month days, days, colors, deck of cards, etc.
I found a great comment on how to visualize a enum:
A Reddit User
Think of an enum like a drop-down list, rather than just a blank text box you can type into. Using an enum ensures that only values you’ve predefined as part of that enum can be present in a particular field/variable, rather than using a raw string which could contain anything.
Example of a engine enum
Custom enums
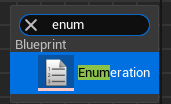
- Create a
Enumerationasset in the Content Browser
- Add the values you want
- Use them where you want
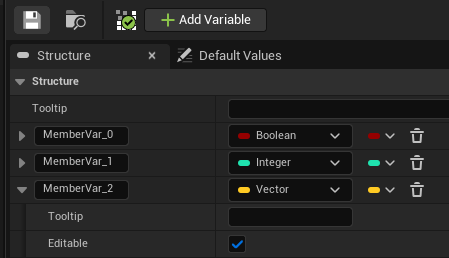
StructtypeA struct is a container of other variables (also known as members/properties).
Custom structs
You can make you own custom structs
- Create a
Structureasset- Add the members you want (you can set a default value for each of them)
Making/Breaking structs
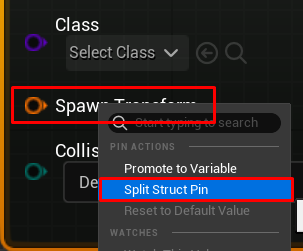
You can
MakeandBreakany struct. This is very useful in some cases.
You can break any struct pin by clicking onSplit Struct Pinafter right clicking on it.
Warning for
EnumandStructThose types can be unstable. Adding new entries while the blueprints are open and saving the changes will at the very least invalidate the nodes, or could cause possible engine crashes.
Containers (
Single,Array,SetorMap)For almost every variables types, you can decide if your variable container type is
Single,Array,SetorMap.
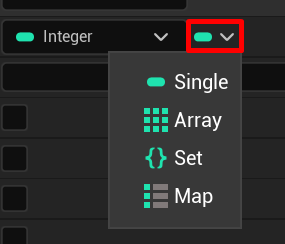
By default it’sSingle, as the name implies, it contains only one value.Array
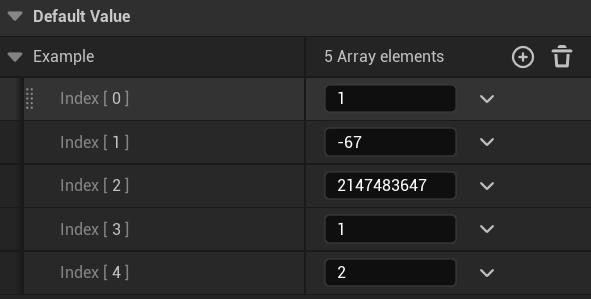
An array can be seen like a list. It can be empty, or contain multiple values. You can Get, Add, Remove, … some of those actions require an index.Set
A set is very similar to the array, but …
- … all entries needs to be unique
- … there is no order in a set, it’s like if you add a marble to a bag of marbles, you know what you added but you don’t know how they got mixed up. So if you convert your set to an array, and try to get the value at index 0, you probably won’t get the first element you previously added.
Map
A map is like a dictionary in other languages. A map contains a list of pair of keys and an associated value. To obtain a value you must therefore give the correct key, there is no order in a map. All keys must be unique.On the left the key (Key) and on the right the associated value (Value).
To get a value, you use the
Findnode
- Red square : The key to use
- Green square: The returned value (if found)
- Blue square:
Trueif the value is found,Falseif the value wasn’t found
Promoting a pin to a variable
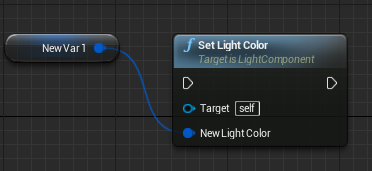
You can also create variables by using Promote to Variable.
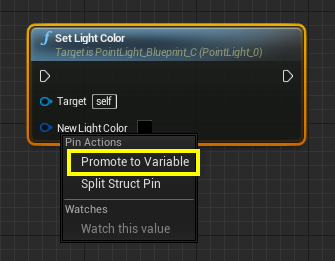
By right-clicking the New Light Color pin and selecting Promote to Variable, we can assign a variable as the New Light Color value.
From UE Docs
Converting between different types
It is possible to convert one type to another. This conversion occurs in a node. UE will sometimes do it automatically when you try to drag a pin to another, otherwise you just have to look in the context menu for the conversion between type
xandy. The syntax is usuallyx to y.For example, here, the
integertype is converted to astring:
Variable options
For each variable you declare in
My Blueprintpanel you can set extra options.
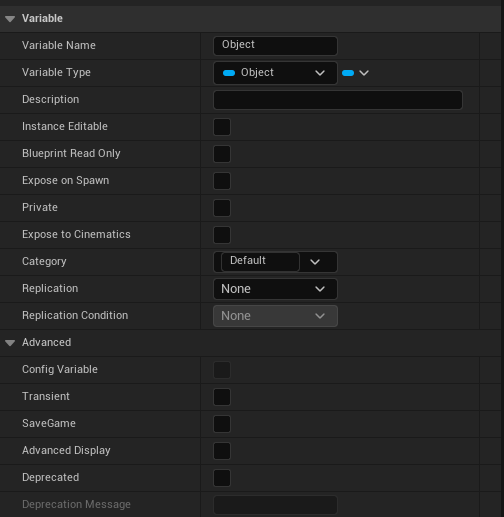
More details on what each option does here.
More
You can find here more details about blueprint variables.
Events, Functions, Macros & Event Dispatchers
Sometimes you need a piece of code in multiple places. Instead of duplicating it, the best is to transform it into a event, function or macro. But what is the difference ?
Mainly:
- Events are used for thing that don’t return anything and that can execute in parallel.
- Functions are used if you need output values.
- Macros are used if you need to use time nodes or if you want multiple exec output pins.
| Type | Exec inputs | Variables inputs | Exec outputs | Variables outputs | Access | Other |
|---|---|---|---|---|---|---|
| Event | One | One or multiple | None | None | Can be called from anywhere if public. | The execution flow doesn’t wait for the “end” of the event, it calls the event then continues. |
| Function | One | One or multiple | One | One or multiple | Can be called from anywhere if public. | Cannot contain any time nodes (Delay, Cooldown, …). Can be overridden in parent classes if public. |
| Macro | One or multiple | One or multiple | One or multiple | One or multiple | Can only be called inside the class. |
Overriding functions
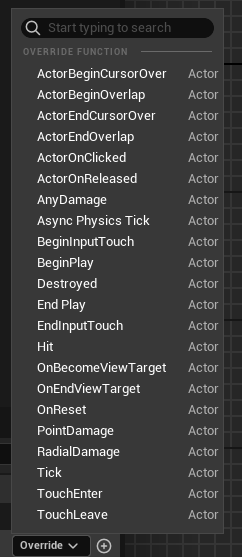
You can override a function in a parent class if the function is public and exposed. For example, the
Actorhas those function overridable by default:
Warning
When you override a function, this means that the code in the parent(s) function(s) won’t be called. If you want to add code in your child class, but still execute code in your parent function implementation, add the
Supernode (can be called at any order).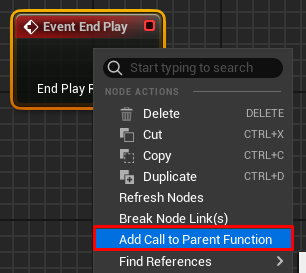
Collapsing nodes into graphs, functions or macros
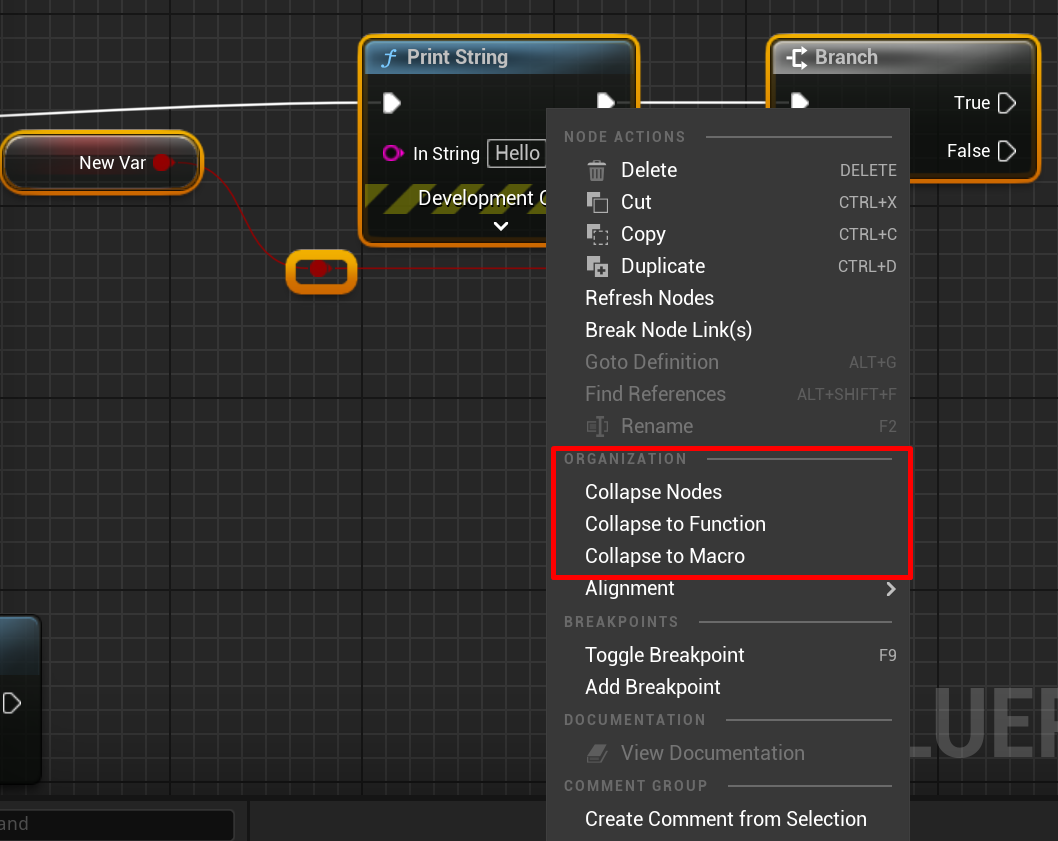
You can collapse code into a graph, function or macro to gain time.
For event dispatchers, it’s a bit special, in blueprints it’s called Event Dispatchers but it’s known in programming as delegates.
See a delegate like a special event that you can “call” (known as broadcast) and “bind to” (known as subscribe). It’s very useful if you want to send an event to anyone interested in it.
Delegates are instance dependent (you subscribe to a delegate of a object instance), they can have multiple inputs and can’t return anything.
For example, you would use a delegate when the player’s health changes to update your Widget (meaning the Widget is bound to your player instance).
Delegate & Event Dispatcher vocabulary
Name in general programming Name in UE Broadcast Call Sends the event to anyone subscribed/bound to it Subscribe/Bind Bind Tells the delegate that we want the given event to be fired when a broadcast/call occurs Unsubscribe/Unbind Unbind - Removes the given function for the delegate, the event won’t fire anymore on broadcast/call.
- For theUnbind Allversion this will removed all binded events of this delegateCallback Event This is the bound event/function called when the delegate is broadcasted/called
Code example
Let’s say we want to call some code with
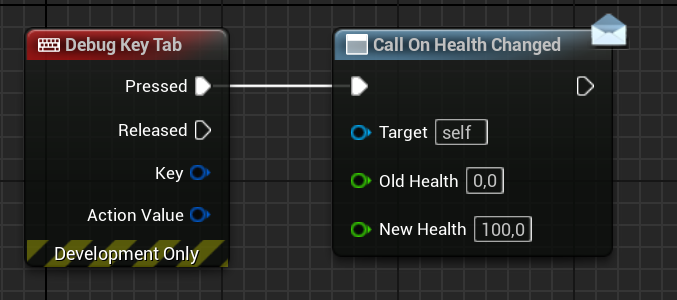
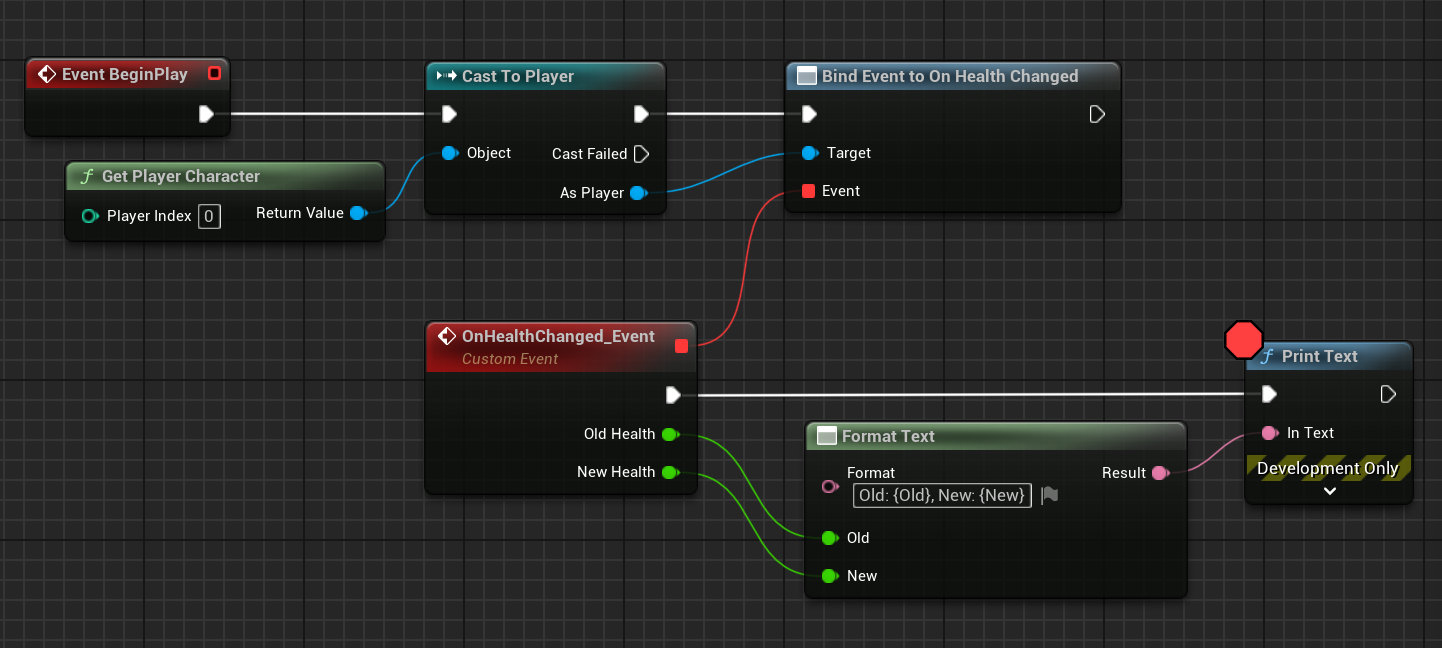
Print Textinside our Level Blueprint when our player health change.Inside player class:
Calling the delegate
Inside level blueprint:
Getting the player and binding an event to it
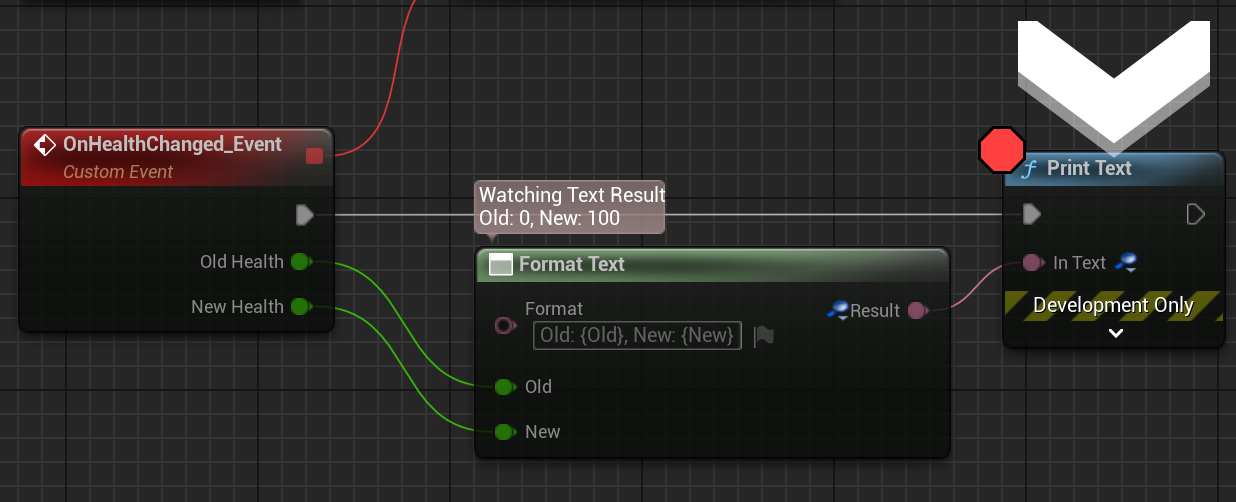
Result:
After I pressedTabmy breakpoint was hit, meaning the level blueprint correctly boundOnHealthChanged_Eventto theOnHealthChangedevent dispatcher.
How to use in a graph
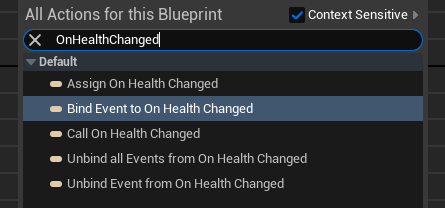
If the event dispatcher declared in the graph where you want to call/bind/assign, you can simply drag & drop your event dispatcher from
My Blueprintpanel and release in the graph, this options will show:
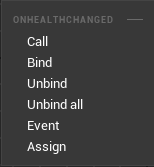
Otherwise, from the context menu you can type your Event Dispatcher name and you will find the same options (without the “Event” one):
Actor & Component delegates
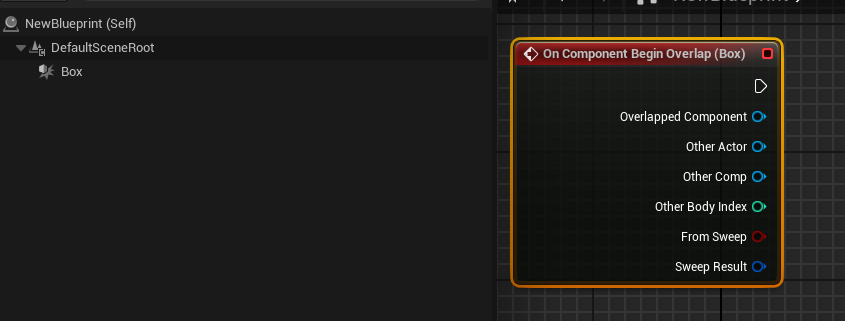
You can get a delegate callback by clicking on a actor or scene component and scrolling down in the details panel.
Here i selected my Box component and clicked on the+next toOn Component Begin Overlap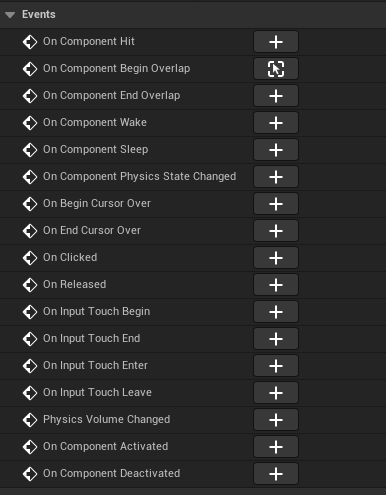
Context Menu
The context menu is what is shown when your right click in a BP graph.
Filter
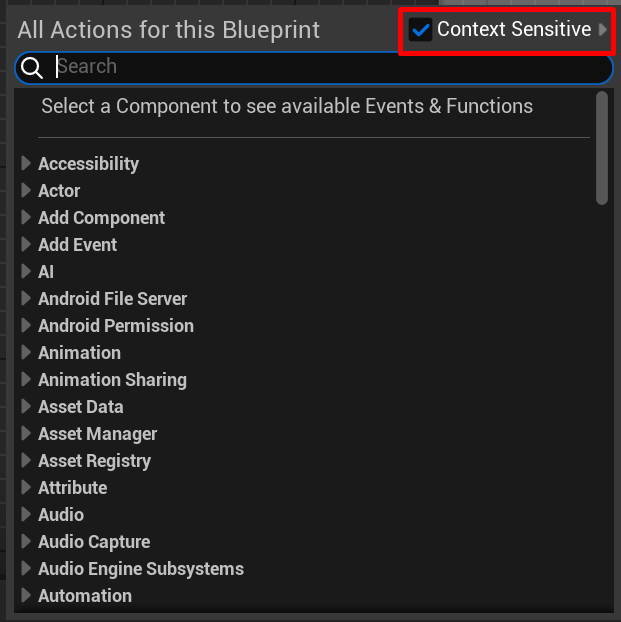
Depending on where you right click (and what you were dragging), the options are different, because UE filters out any actions for you that are “unrelated/don’t make sense”.
Toggle filtering
You can deactivate/reactivate this filter at the top right.
Keywords
UE saves you time, you don’t need to type the full name of each node to get it. Just type in keywords.
Example with basic math operations
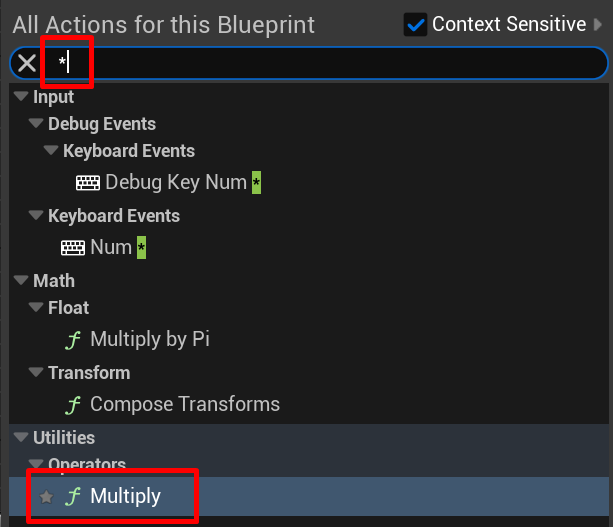
If you want to do a mathematical operation, you can type the symbol directly.
This works with Add (
+), Substract (-), Multiply (*), Divide (/) and more !
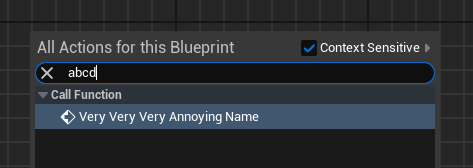
Custom keywords
Some keywords are premade (mostly for engine nodes), but you can add yours in the
Keywordsentry.
Organizing nodes
There is different ways to keep your code organized.
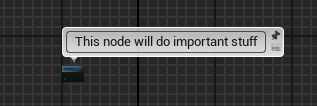
The most known one is comments ! In UE you can comment individual nodes, or comment inside a group.
Individual node comment
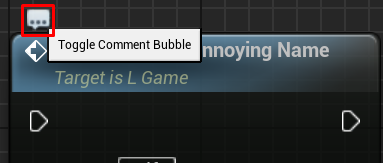
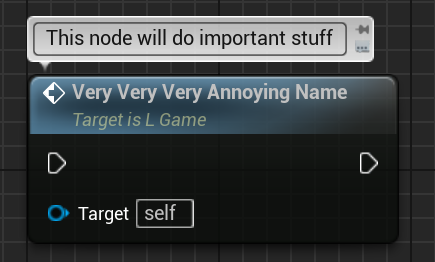
Hover your node then click on the little bubble to show it (and do the same if you want to hide it).
Pinning a comment
You can make a comment always displayed in a graph by pinning it, even when zoomed out.

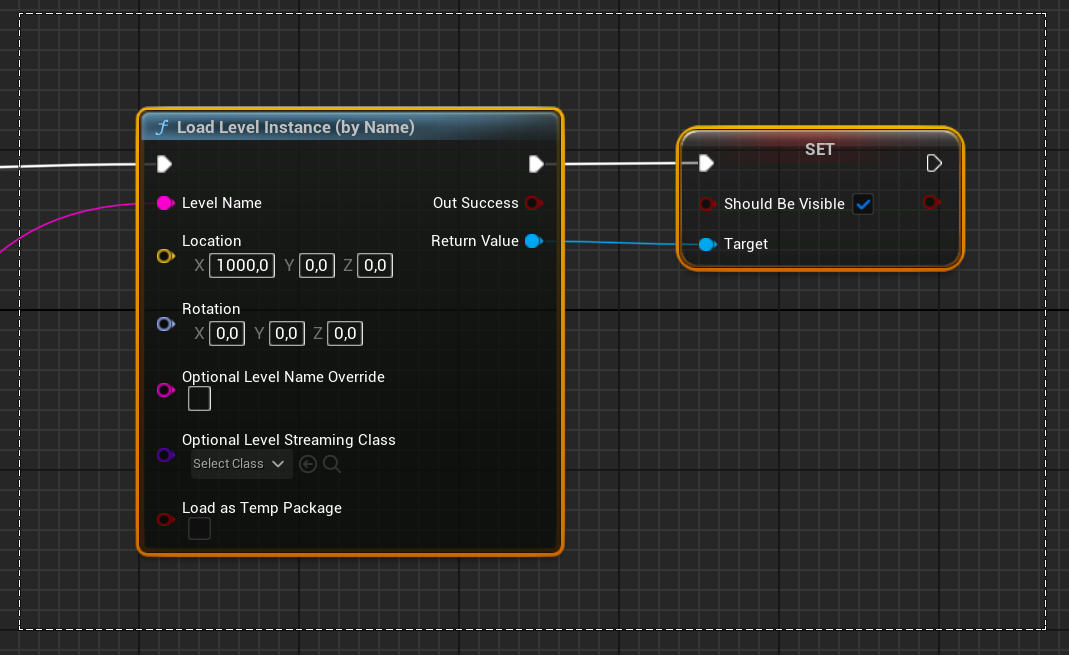
Group comment
You can make a group by pressing the group key (C key by default), if you want to make a group around already placed nodes, drag an area with your mouse then press the group key.
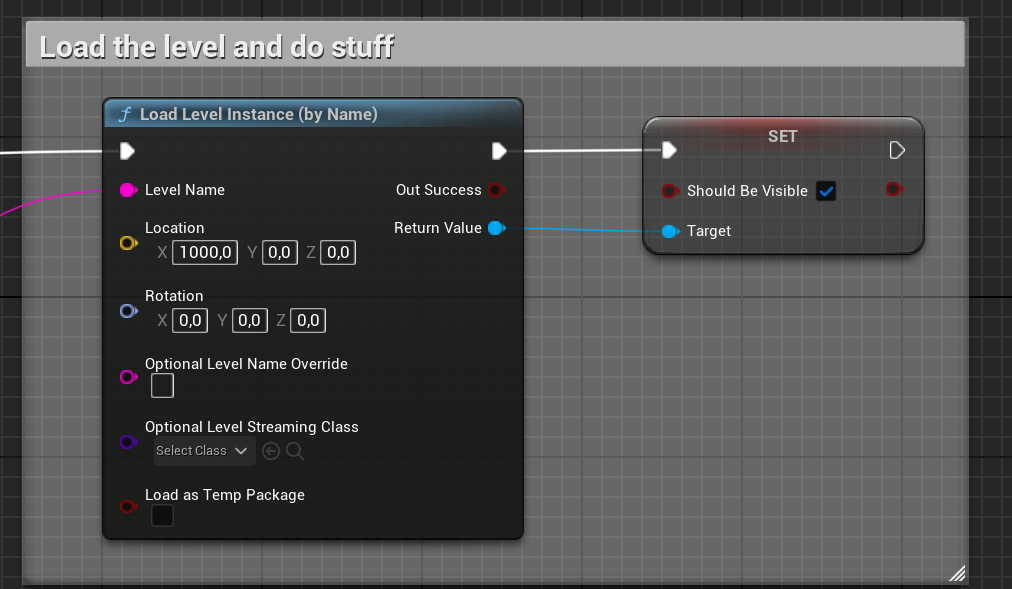
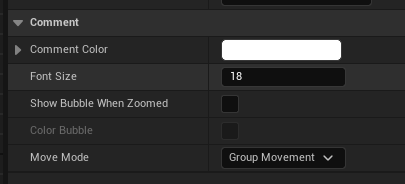
Custom Group Color
You can change a group color individually in the details panel (with the group selected). There is also other settings.
If you want to edit the default comment color, you can change
Default Comment Node Title Colorin the engine settings
Reroute nodes
Sometimes you will have lines that will overlap each other or with nodes. With a double click on the line you can create a Reroute Node.
This is possible with execution and variables lines. Once created you can move reroute nodes wherever you want.
Example
Before:

After:
Categories
In order to better organize your variables, functions and macros, you can create categories and an infinite number of subcategories.

Info
Categories are also displayed in the context menu.
Debugging
Once you finished coding something, you will test it, and if it goes wrong (or if you want to be sure everything works as planned) you will debug your code.
Debugging is the process of identifying and removing errors or unwanted behaviors.
Blueprint debugging features are disabled in packaged builds.
Print
The most common way to debug is to Print something.
In UE, you can use the Print String or Print Text nodes.
Print Text is recommended if you want to print runtime values (from variables for example)
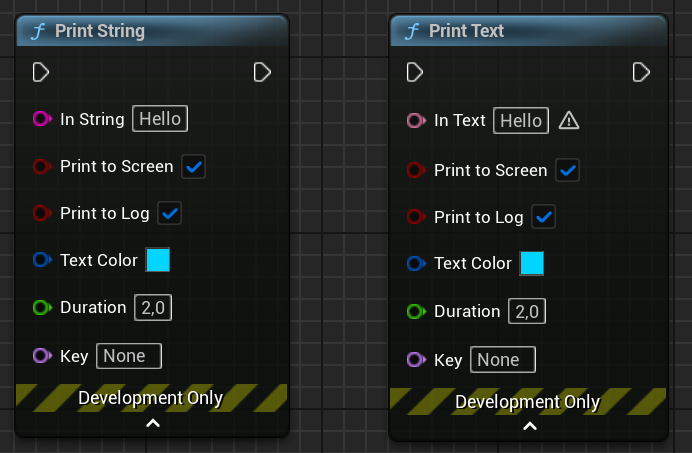
Print to Screen & Print to Log
- Screen: Will show on the top left of your PIE window.
- Log: Will show in the Output Log.
Breakpoints
From UE Docs
“Blueprint debugging is a powerful feature that provides the functionality to pause the execution of a game during Play In Editor (PIE) […]. When debugging, you can step through any graph of a Blueprint or Level Blueprint through the use of Breakpoints.”
Example
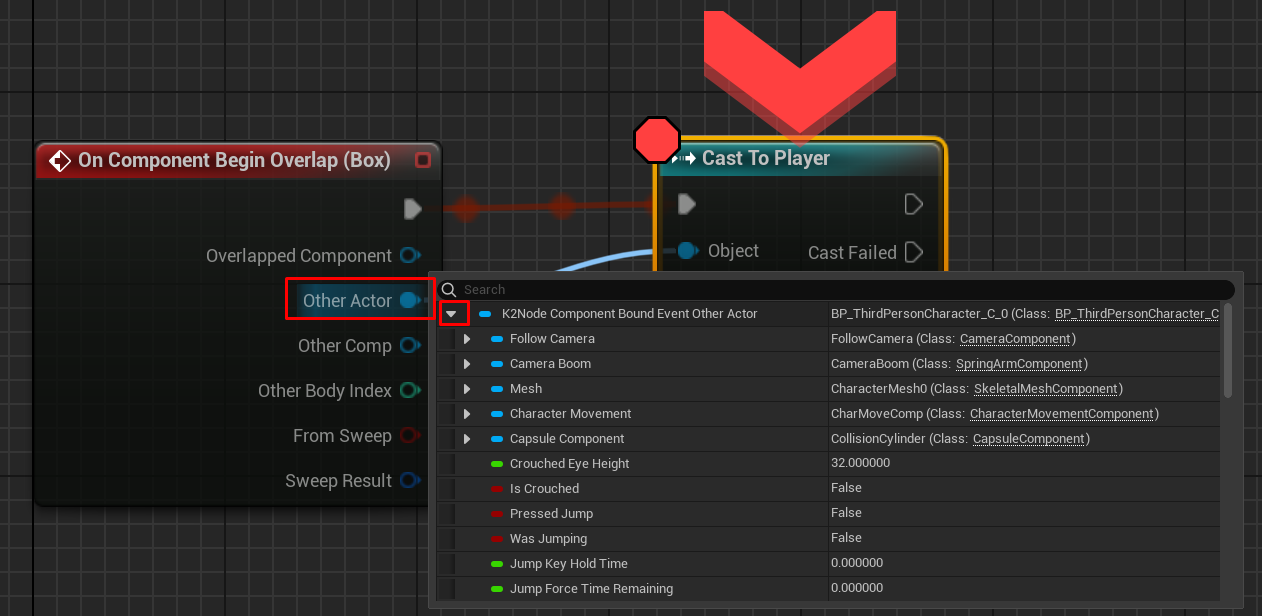
For example, I placed a breakpoint on the cast node
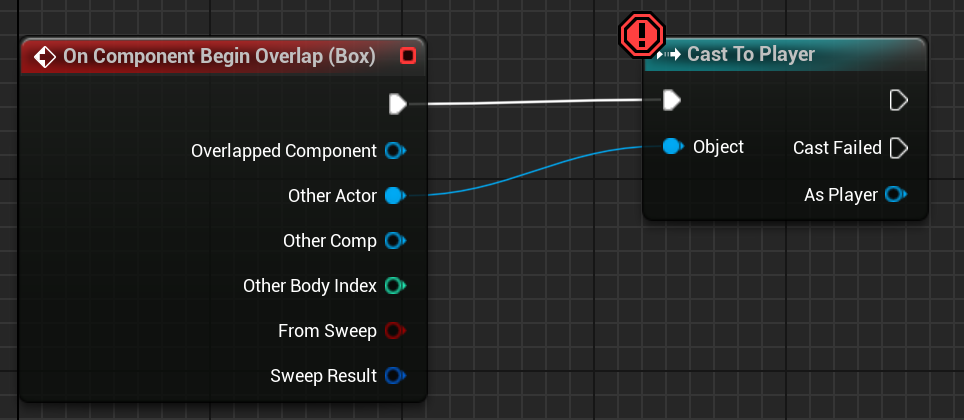
If I play and overlap with the box, my game will pause and the graph with the breakpoint will open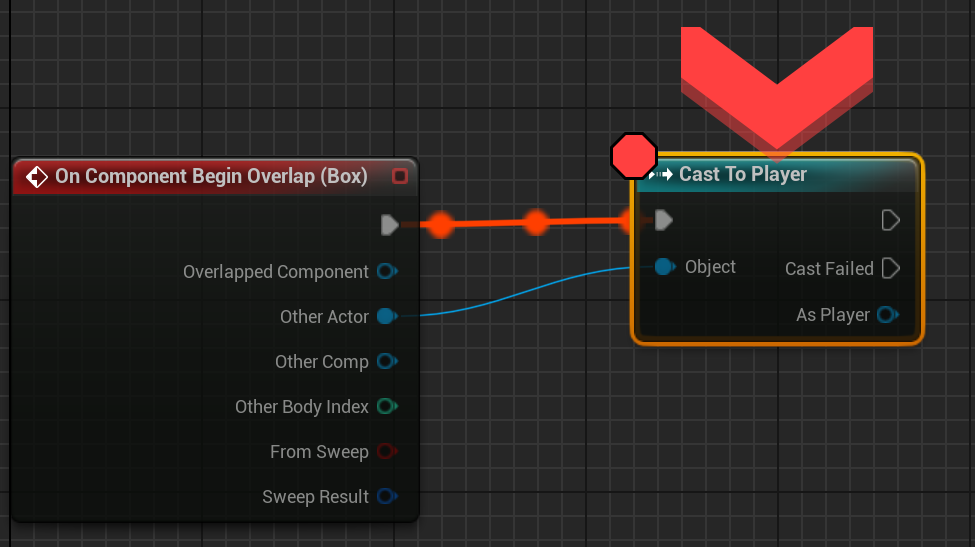
If you hover the pins you will be able to see what data is contained
How to place breakpoints
All breakpoint options are available when you right click on a node.
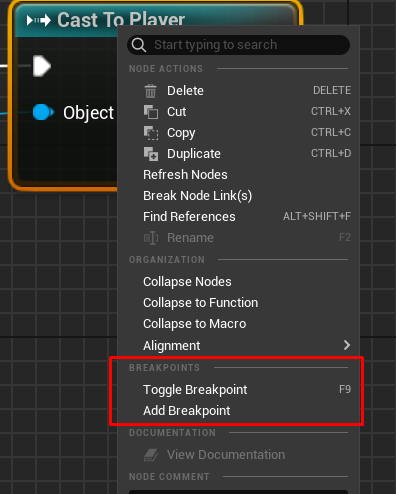
To quickly toggle a breakpoint on a node you can use the shortcut (F9by default).
Execution control
When a breakpoint is hit, your game is pause, which means you can decide what you want to do next.

More details here
Warning
- Breakpoints placed on event nodes won’t be triggered.
- You can only place breakpoints on impure nodes.
- Depending on your hardware, UE can crash if you keep it paused to long on one breakpoint
More
More about the breakpoint features here
Watch
The watch feature works with breakpoints, it allows you to see a value of a pin without hovering it manually.
Example
Here I am watching the value of
Delta Secondsand myTimevariable
When I press play and the breakpoint is hit, here is what i have:
After a few seconds, here is what I have:
How to start/stop watching a value
To watch a pin you must right click on it and click on
Watch This Value.
To stop watching a value, rich click on the pin and click onStop Watching This Value. Or click on the lens (🔍) icon.
Draw
Sometimes when you debug some code you want to visualize locations, rotations or shapes.
This is easily done with Draw Debug [...] nodes, they can be called in any context (if you have a valid world) and they have a lot of parameters.
List of debug draw nodes with example here: All Debug Draws
Miscellaneous
Blueprint
Select
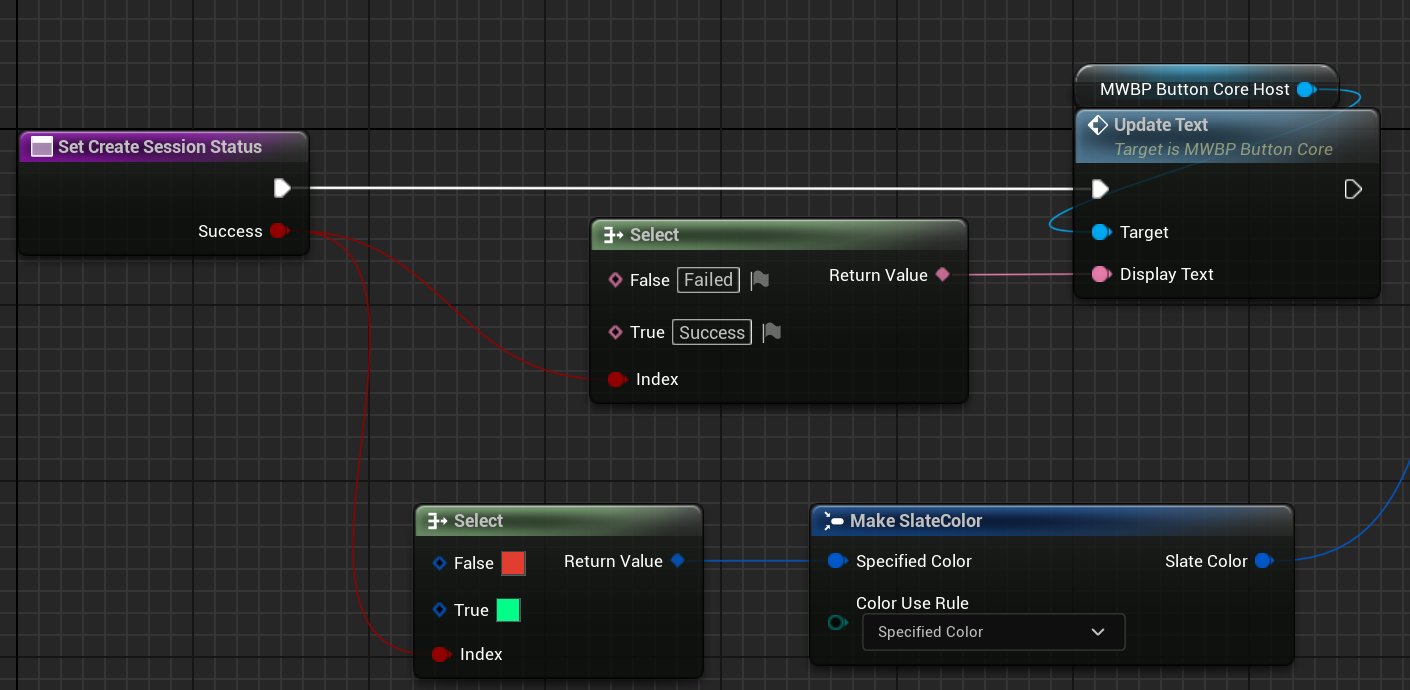
If you want to set a value to something depending on a value (usually a bool or a enum value) the select nodes are a perfect choice.
Example:
Rearranging nodes and connections
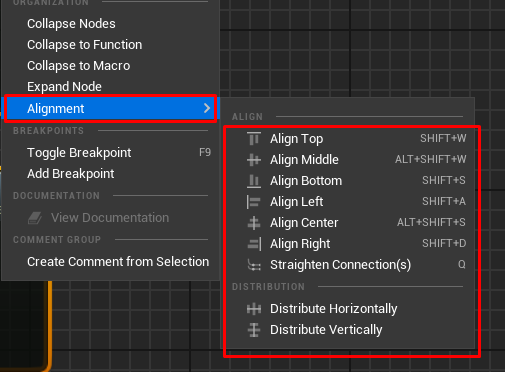
You can rearrange nodes and connections, just selected the concerned nodes, right click and go to
Alignement
Example
Before:
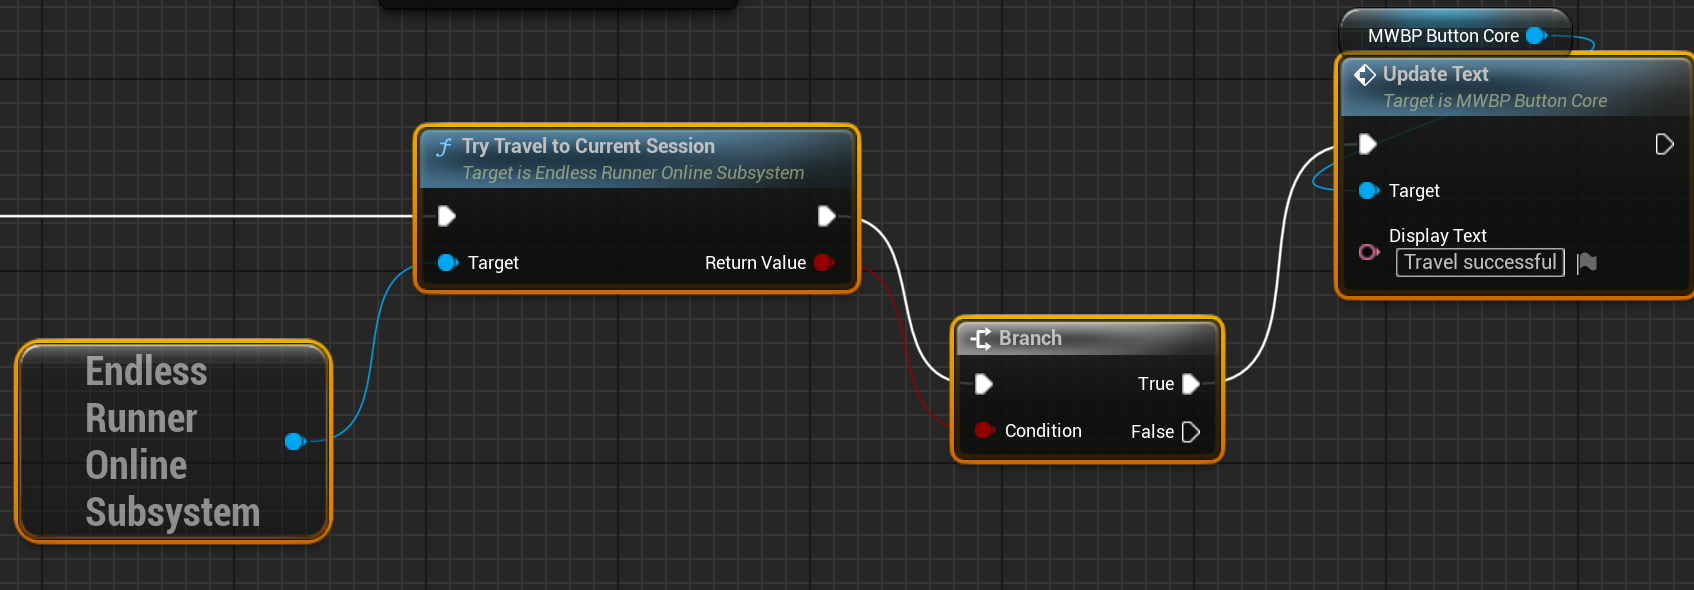
After:
Hiding struct pins
When you Make, Break or Set members a struct, you can decide to hide unconnected pins
Before:

After:
Smart Delete
When you remove a node, all connections to other nodes are lost.
If you pressShift + Deletethe function input and output Exec pins will be merge with the closest connected nodes. Example:
Before:

After:
Timeline
TODO
Viewport tools
Fast duplicating
If you select an object in the viewport, then hold
Altand drag a axis (location, rotation or scale) this will duplicate the selected object and let you move/rotate/scale the new one.Example
Modeling tool
TODO
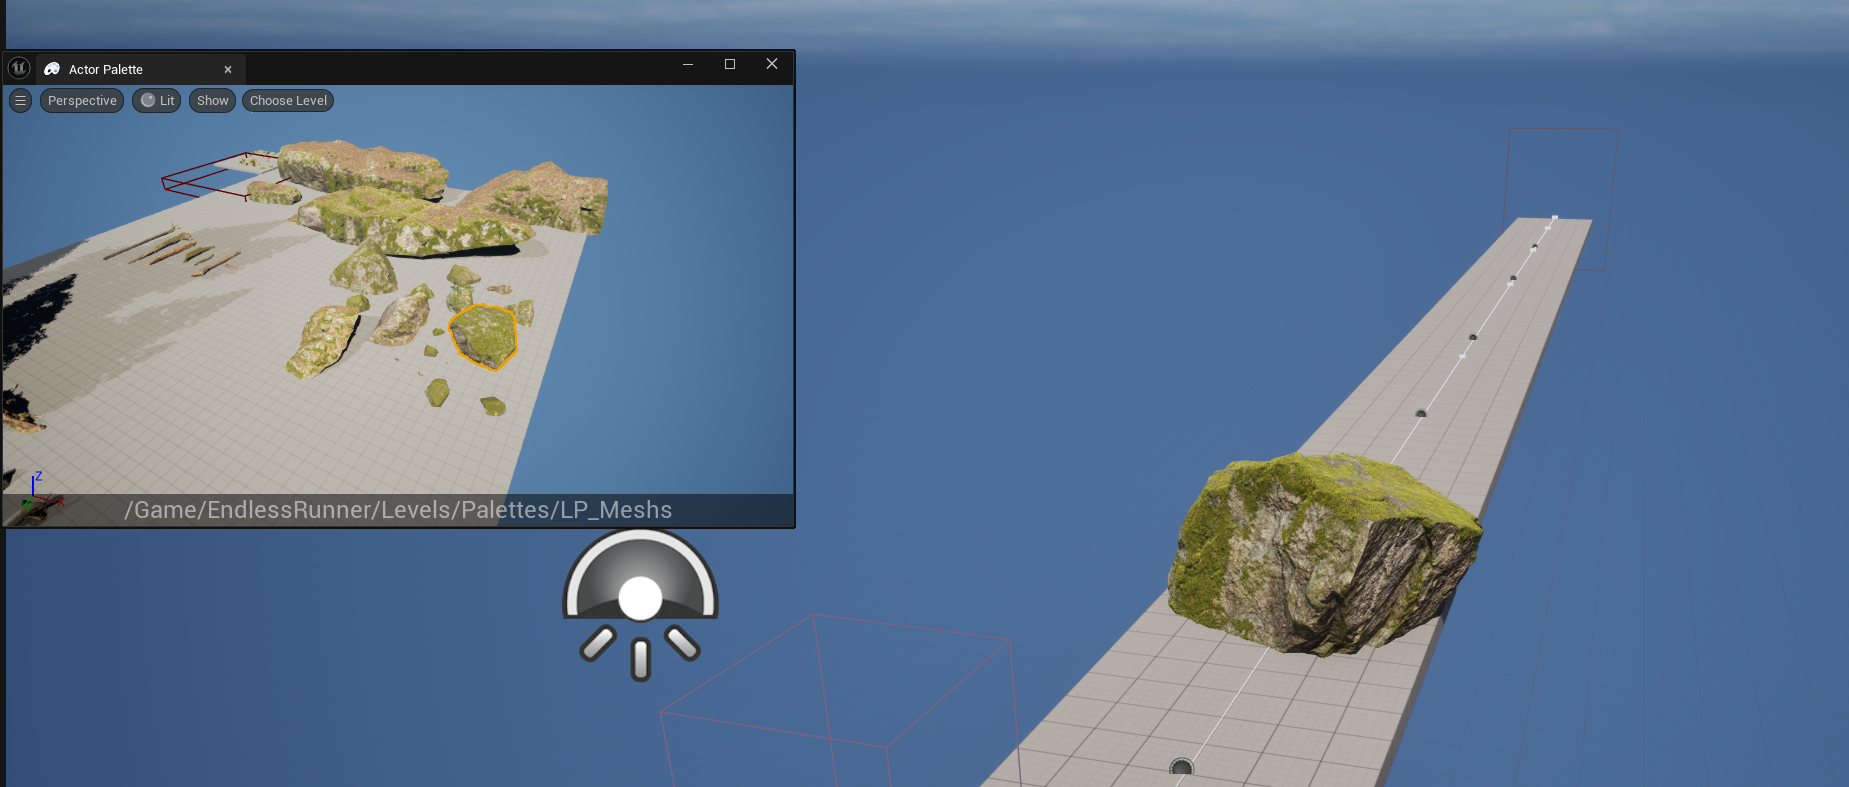
Actor Palettes
Easy way to drag and drop actors between a palette level and your current opened level. How to use: https://unrealdirective.com/tips/the-actor-palette Example:
Input Systems
UE has two input systems, the first one is old and should not be used if you use a engine version greater than 5.0. The second one was officially introduced in 5.1, named “Enhanced Input System”. And like the name says, it’s a lot more powerful than the previous one.
The default characters in the First Person and Third Person templates already uses the Enhanced Input system, it’s a good idea to check how it’s all setup there before doing it from scratch in your project.
More about Enhanced Input
More can be found about the Enhanced Input System in the Official Documentation
Training exercises
So now that you read all of that, you need some practice to be sure your understood everything AND to learn even more !
If you already have some projects ideas and the listed exercises seems to boring for you, don’t hesitate to directly start to learn by doing your project.
But be careful ! Don’t overkill yourself with a very big game that will probably make you hate UE (because what you have to learn will be to big for a new UE user).
Start with something “small” or “medium”, something that you like and can be scaled up when you will have more knowledge and motivation to make a great game !
Exercises
More
More resources and tools if you want to go further.
Useful links
Tools & plugins
A list of some of tools and plugins I used a lot when working with Blueprints (mostly free).
Tools:
- BlueprintUE: A easy way to preview and share code with a link
Fab plugins:
- Auto Size Comments: Adds cool features to comment groups
- Live Blueprint Debugger: More debugging power
- Math Extension Nodes and Functions: Add math nodes for types with no default math operations support.
- [Blueprint] Array Helper: A bunch of new nodes to do operations on arrays.
- Sorting Array: Sort array nodes
Recommended YouTube channels
General stuff:
Materials:
YouTube warning
Sadly, a lot of UE YouTube content about programming (and mostly for BP) shows wrong/bad ways to program or use UE features.
If you want to keep using YouTube as your main learning tool (not recommended), please try to understand why a youtuber tells you something, and don’t follow him like a sheep 🧠.
Credits
Special thanks to the incredible people in the Unreal Source Discord for their valuable feedback, which has improved the quality of this page and the accuracy of its content.


